"Werte Marda"
That is hello and welcome in Arrernte. I would like to welcome you to our website on how to play a didgeridoo.
My name is Paul. My skin name is Ngala and I am the Manager of the Aboriginal Art and Culture Centre located here in Alice Springs. I would like to welcome you to our website on how to play a didgeridoo, but before we get into the lesson, I would like to tell you about our community and our community enterprise.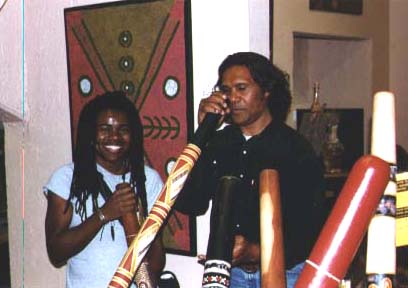
Paul AhChee & Tracy Chapman at the
Didgeridoo University - Alice Springs
The Aboriginal Art and Culture Centre is owned and operated by the Pwerte Marnte Marnte Aboriginal Corporation. We have a community which is based 80km south of Alice Springs and the Aboriginal Art and Culture Centre as an enterprise is set up to finance our operations on our homelands by providing employment and providing housing, infrastructure, water and power. Pwerte Marnte Marnte Corporation in a southern islander tribal grouping and we have been in business since 1995. For more information visit the Community section of the site.
Listen to the welcome message from Paul Ahchee Ngala, Manager of the Aboriginal Art and Culture Centre.
Learning How to Play the Didgeridoo
I would like to now take you into a didgeridoo lesson. The didgeridoo
is also known by the name of Yidaki, which is a word that the Yolungu
people use in the northern parts of Australia. The first step that
I would like to take you through is getting the didge sound. We
must remember that the didgeridoo is one of the oldest wind instruments
in the world and therefore it is a very simple instrument to play.
|
Read text below and click
on sound grabs to play the audio.
|
STAGE 1 GETTING A SOUND
| 1.1 | To get a sound, you need to vibrate your lips. To vibrate your lips, you must relax the muscles that are in your face, i.e. your jawbones, your cheeks, and just loosely have your lips and then pass the wind through your lips like so. | Lesson 1 |
| 1.2 | Okay, if you can do that sufficiently, you are able to get a sound through the didgeridoo. Remember, you must hold your lips very loosely and then gently blow wind through your lips. | loose lips |
| 1.3 | Once you have done that, you must proceed to put your lips onto the didgeridoo and then sealing your lips into the didgeridoo, create the vibration sound through the didgeridoo. | didge sound |
| 1.4 | We must remember that the didgeridoo acts as an amplifier. The didgeridoo will naturally amplify that vibration sound to create what we know as the didgeridoo drone like so. | drone |
| 1.5 | Okay, you seem to have mastered that sound. We will now move on to stage 2. |
STAGE 2 GETTING A VOCAL
| 2.1 | Stage 2 is getting the vocal, projecting the vocal through the didgeridoo sound. | Lesson 2 |
| 2.2 | Over the course of the lesson, I will continually refer back to the didgeridoo sound which is the loose vibration of the lips and gently blowing wind through. | loose lips |
| 2.3 | That is the didgeridoo sound. | didge sound |
| 2.4 | The projection of vocal is a sound that is projected from your vocal chords. | |
| 2.5 | I am talking to you because I am projecting a vocal from my vocal chords. I am not blowing wind from my cheeks, I am actually talking. |
STAGE 3 GETTING A VOCAL - THE OWL
| 3.1 | Okay, the first sound that we will attempt will be the owl sound. The owl sound is a simple sound which sounds like this. | Lesson 3 |
| 3.2 | Okay, if you can do that sound, you need to combine that sound with the didgeridoo sound. The didgeridoo sound is the vibration of the loose lips. | loose lips |
| 3.4 | The owl sound is this sound. | owl |
| 3.5 | Which is a projection of your vocals. What we have to do now is we need to put those two sounds together. | |
| 3.6 | The didge sound and the projected vocal sound. | |
| 3.7 | Putting these two sounds together, you should be getting a sound like this. | lip & owl |
| 3.8 | Okay, now if you get onto the didgeridoo, put
your lips into the mouthpiece, seal it off and do the sound,
this is the sound that you should be getting.f it is sounding
a bit too light, maybe you are not vibrating your lips enough.
If the sound of the owl is not coming through loud enough, maybe
you are not projecting your vocal. Remember the two different
sounds are different sounds. The didge sound is the vibration
of the lips, the owl sound is the projection of a vocal.
So just try it one more time. Okay, it seems that you have mastered the owl sound. |
lip & owl combo |
STAGE 4 GETTING A VOCAL - THE KOOKABURRA SOUND
| 4.1 | We would now like to move on to the kookaburra
sound. The kookaburra is a native bird to Australia and it makes a sound like this. |
Lesson 4 |
| 4.2 | Now remember, the didge sound is the loose vibration of your lips which is like this. | didge sound |
| 4.3 | The kookaburra sound is a sound like this. | kookaburra |
| 4.4 | That sound is a projection of a vocal. Say the word "kook", "kook", "kook" as opposed to the owl sound which is a sound which goes like this. | kook kook |
| 4.5 | Okay, on a scale of one to ten, the owl sound is probably the simplest sound that you can project through a didgeridoo and the kookaburra sound is of the highest end of the scale in degree of difficulty because you have to say a word, which is "kook". Should we try that sound again, the kookaburra sound. | |
| 4.6 | That's fantastic. Okay, what we need to do now is that we need to combine the kookaburra sound with the didgeridoo sound. Now remember the didgeridoo sound is a loose vibration of the lips. | loose lips |
| 4.7 | The kookaburra sound is this sound. | kookaburra |
| 4.8 | Putting together, it should sound like this. | lips & kookaburra |
STAGE 5 GETTING A VOCAL - THE KOOKABURRA SOUND (continued)
| 5.1 | Right, the next stage now is to put your lips into the mouthpiece of the didgeridoo and make the sound through the didgeridoo. Remember to stay calm, relaxed and let the didgeridoo do the work and it should sound something like this. | Lesson 5 |
| 5.2 | Very good, very good. If you have any difficulty with the kookaburra sound, you should practice the sound, the vocal off of the didgeridoo, practice that and then go onto the didgeridoo. Remember it is the technique that you have to master. | |
| 5.3 | Once you have mastered the technique to the sound, you will find it very, very easy to project a vocal through the didgeridoo sound. | |
| 5.4 | Okay, lets try that one more time, the kookaburra sound. | lips & kooka combination |
STAGE 6 GETTING A VOCAL - THE KANGAROO
| 6.1 | The next sound that we are going to do is the kangaroo. | Lesson 6 |
| 6.2 | The kangaroo is a totem for most Aboriginal people in Australia. It is an icon and the sound of the kangaroo through the didgeridoo, we need to incorporate our tongue. To incorporate our tongue, ok remember we need to keep the didgeridoo sound which is the loose lips and the wind passing through, and using the tongue on the top, the roof of your mouth and flicking it down to hit the front of your lips. | |
| 6.3 | What we are doing is we are forcing through air through the lips to get a sound which is something like this. | kangaroo |
| 6.4 | Okay, this is a difficult sound, but with practice you will find that it should not take you too long to be able to master this sound. Okay remember we vibrate our lips to get the didgeridoo sound. | didge sound |
| 6.5 | I will now demonstrate to you the kangaroo sound.
Very good. |
kangaroo didgeridoo |
STAGE 7 - CIRCULAR BREATHING (Stage 1)
| 7.1 | Okay, what we will do now, we will move to stage 3 of our didgeridoo lesson which is circular breathing. | Lesson 7 |
| 7.2 | There is a lot of myths in relation to circular breathing. Circular breathing is a very simple technique. I will hope to show you circular breathing in three different stages. | |
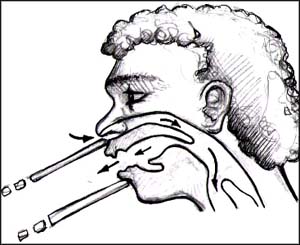
| 7.3 | The first stage of circular breathing is that we need to trap air and where we trap air is in our cheeks. Once the air is trapped in our cheeks, we must release that air gradually. We must regulate the amount of air that is being released through our lips. | |
| 7.4 | Whilst we are doing that, we then breathe through our nose to put air back into our lungs and then push the air from our lungs back into our cheeks to continue playing didgeridoo, that is the concept of circular breathing. | |
| 7.5 | Whilst I am talking to you, I cannot breathe through my nose. It is a physical impossibility for me to breathe through my nose. I must stop talking to breathe through my nose because I am expending too much air. Okay, the first stage of the exercise is to trap air in your cheeks and blow as much air in your cheeks without releasing any air so that your cheeks resembles a balloon. Very good. | |
| 7.6 | Once you have done that take five deep breaths
of air through your nose. Whilst you are taking these breaths
through your nose, you should not be feeling uneasy, hyperventilating
because you are breathing through your nose, the only thing
that you are doing differently is that you have a mouth full
of air. Very good. |
|
| 7.7 | If you can have air in your cheeks and breathe through your nose, congratulations you have passed the first stage of circular breathing. |
STAGE 8 - CIRCULAR BREATHING (Stage 2)
| 8.1 | The second stage of circular breathing is releasing that air that you have trapped in your cheeks. Now remember, the air that is in your cheeks needs to be passed through your lips, but it needs to be regulated so that it doesn't come out too fast. | Lesson 8 |
| 8.2 | If you can picture a balloon, you've blown the balloon up, that balloon represents your cheeks, the mouthpiece of the balloon, if you were to get your fingers and hold a mouthpiece of the balloon and regulate the amount of air that comes out of the balloon, that is what you have to do with your lips. | |
| 8.3 | Your lips are the mouthpiece of the balloon. You must release that air that is in your cheeks out through your lips. Remember you are releasing the air that is in your cheeks, not the air that's from your lungs. | |
| 8.4 | You are hopefully going to release air through your cheeks, out your lips, and breathe in air through your nose to replenish the air that is in your lungs, so we should hear a sound similar to this. | |
| 8.5 | I will now fill my cheeks up with air, breathe through my nose and release some air out of my cheeks, like so. | circular breath |
| 8.6 | If you can do that, congratulations, you have passed stage 2 of circular breathing. |
STAGE 9 CIRCULAR BREATHING (Stage 3)
| 9.1 | Stage 3 of circular breathing is to combine both of those stages, stage 1 of putting air into your cheeks and breathing quite comfortably through your nose, stage 2 is the release of that air by using the force of your cheeks, pushing the air through your lips which are regulating the amount of air that is coming out. Stage 3 is the combination of those two stages. | Lesson 9 |
| 9.2 | I will talk you through the stages of circular breathing for stage 3. Okay, we fill our mouth up with air, we breathe through our nose 1, 2, on the third breath, start to release a bit of air out of your cheeks, the moment that you do that you are circular breathing, 4 and 5, you should be circular breathing. |
|
| 9.4 | Now remember that sound of pushing air out through your lips and regulating that air is not the didgeridoo sound. The didgeridoo sound is this. | didge sound |
| 9.5 | Passing air through your lips creating a vibration. The intense sound that you get through regulating the air through your cheeks, through your lips is not the didgeridoo sound, but it is the technique for circular breathing. Okay, now we will attempt circular breathing on the didgeridoo. I am going to fast track you through three stages of getting a constant didgeridoo sound. The first stage, I will get the didgeridoo sound, which is this. | didge sound |
| 9.6 | I will stop, fill my cheeks up with air, take two deep breaths through my nose, then let some sound out of my lips. | |
| 9.7 | Whilst breathing through my nose. The second stage is I will not stop to release any air, now remember I am not concentrating on getting the didgeridoo sound constant. I am only concentrating on getting a sound through the didgeridoo. | |
| 9.8 | The second stage is that I will make a didgeridoo sound. | didge sound |
| 9.9 | And when I come to circular breathe, I will make
this sound. And I will go back to making the didge sound. |
circular breath |
| 9.10 | On the third stage I will go from making the didge sound. | |
| 9.11 | To the circular breathing sound. | circular breath |
| 9.12 | Somewhere in between those two sounds is the meaning of circular breathing, so you need to train your lips and your cheeks to be able to trap air. | |
| 9.13 | If you make the didgeridoo sound which is this. | didge sound |
| 9.14 | You are expending too much air and if you make the circular breathing sound like this, that is not the didgeridoo sound, so we need to make a sound something like this. | |
| 9.15 | So now I will demonstrate to you the three stages of circular breathing. | 3 stage breath |
SUMMARY
| 10.1 | Okay, Kele. "Kele" is a word that Arrernte people use that means "finish". | Lesson End |
| 10.2 | Before we are finished though, I would like to recap what I have taught you. The three basic steps of learning to play the didgeridoo are | |
| 10.3 | Step 1, getting the didge sound. | |
| 10.4 | Step 2, projecting your vocal | |
| 10.5 | Step 3, circular breathing. | |
| 10.6 | If you find that you have any difficulties, please contact the Aboriginal Art and Culture Centre by e-mail and tell us of your progress. | |
| 10.7 | So once again, thank you and I hope you have a good time learning how to play the didgeridoo. Kelemada. |